The Best Home Oven Pizza
- Sam
- Feb 28, 2021
- 7 min read
There are more ways to assemble and cook a pizza than there are opinions on what constitutes a "good pizza", and boy there are a lot of those. It's safe to say Paul and I are pizza traditionalists. Never will chicken or pineapple touch our pies. It's not to say those things can't be great on pizza, they can be! But it's not our style. Bring on the sopressata, the salami, the prosciutto. We'll leave the deli ham for sandwiches. (jump to recipe)
And dough? Whether you like New York, New Haven, Chicago, or the timeless Neapolitan style pizza, take the few extra minutes to make it yourselves, and dear god, do not use a pizza press. Those things have ruined New York style pizzas. (Have you noticed? Where have all the NY slices gone?) Toss it, stretch it, poke it with these amazing kitchen tools called fingers and you will have a better pizza in the end. I promise.
This is a Neapolitan-ish pizza method post. The rules for Neapolitan style pizza were laid out by the AVPN (Associazione Verace Pizza Napoletana) in 1984 to establish what this ancient method requires and to rein-in the pizza joints inaccurately claiming to sell this style of pizza. We are not following these rules exactly, since the use of a home oven precludes that, but we are aiming to mimic the style. For those of you that do not have access to a 900-degree Fahrenheit pizza oven but would like to make this style at home, read on!
WHY THIS METHOD?
With this method, we will strive to get as close as we can to a Neapolitan pizza in a conventional oven by applying high heat to the bottom and the top of the pizza separately. A gas oven does work better, but electric will work too. I read about this method years ago and have used it many times since. I can't for the life of me find the original article. If I do, I'll be sure to credit and link to it. What follows comes from my memory of that article and what changes have happened over the years, along the Pizza Journey. Why this method? Because it's fairly easy & foolproof, but most importantly, it has consistently produced DELICIOUSLY GOOD pizza for us from the oven.
The dough recipe comes from Roberta's of Brooklyn. It has been posted by NYT cooking, Epicurious, and Serious Eats, just to name a few. In short, people who know dough science believe in this and we do too. So stop looking, this is the dough recipe. I have doubled it below from the original recipe because - we're hungry. I have written in detail my method for stretching the dough balls into pie rounds.
For toppings, we use canned (28oz.) whole San Marzano Tomatoes, blended with a hand bender and cooked low and slow for about 45 minutes with 2-3 cloves of chopped garlic, 2 teaspoons oregano, and 1+ teaspoons of salt, depending on taste. You can also use them straight from the can, smashed up or blended. We use ciliegine-sized (literally "cherries") fresh mozzarella for pizza margherita (I like to cut in half) and low-moisture whole milk mozzarella for almost everything else. This does not come in water since it is low-moisture. It comes as a ball/cylinder in vacuum-sealed plastic wrap and is usually in your deli cheese aisle, hanging out with the ham. Grate it for your pizzas, and use leftovers to make Big Sandwich. The rest is up to you, my friend.
WE LIKE:
Margherita; post-oven basil, whole leaves. We always start with a margherita.
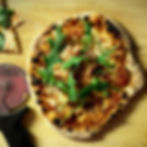
Prosciutto with shredded mozzarella and post-oven arugula.
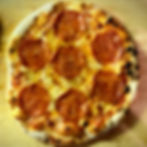
Sopressata with tomato sauce and grated mozzarella, finished post-oven with Mike's Hot Honey. Our local and amazingly delicious pizzeria, Paulie Gee's, does this combo and it's a home run. You can make your own hot honey by cooking dried chiles de arbol in honey on low for 5 minutes, straining, and reserving. Use it on many things.
White clam pizza; literally open a can of Cento white clam sauce and put it on like you would red sauce, straining out some extra clams to top it with, and finish with shredded mozzarella and a drizzle of garlic-infused olive oil. For that: cook chopped garlic in some olive oil on low for a few minutes, strain and there you go. Use it on may things. Maybe also add ricotta to this pizza, see further down.
Capricciosa; meaning, "capricious", meaning "given to sudden and unaccountable changes of mood or behavior". Named so for the indecisive eater because there's one of everything on it. When I ate this pizza in Italy in 2004, it changed my life, in particular, the egg did. A traditional capricciosa has red sauce and cheese, one olive, one piece of prosciutto, one artichoke heart quarter, and one egg. You eat it with a knife and fork, poking into the egg and spilling golden goodness all over the plate. You would be hard-pressed now to find the egg cooked over-easy right on the pizza like it was back in the day, but will likely find a hard-boiled egg quarter in its place. Something about EU food safety rules. I highly recommend trying this at home because it's phenomenal. Quail eggs work well!
Red sauce with grated mozzarella and thin sliced mushrooms. Don't overthink it.
I like filling a piping bag with ricotta, sometimes spiked with garlic-infused olive oil and parsley, sometimes not because then it also goes on the dessert pizza. I then pipe it on in little swirls. I LOVE ricotta on pizza. If I have leftover, I will pipe it onto toast in the morning.
Dessert pizza: Ricotta & pre-oven hot honey and (close your ears traditionalists) ricotta, sliced banana, peanut butter, chocolate chips, and marshmallows. Add the marshmallows when the pizza is just about done and stick it back in for a few seconds, until your shade of toasted mallow is achieved.


YIELD
eight 9" pies
EQUIPMENT
9" cast iron skillet
2 cups + 2 tablespoons type 00 flour (306g)
2 cups + 3 tablespoons all-purpose flour (306g)
2 teaspoons fine sea salt (16g)
1.5 teaspoons active dry yeast (4g)
2 teaspoons e.v. olive oil (8g)
about 1 3/4 cups of lukewarm water (400g)
RECIPE
2-3 DAYS BEFORE PIZZA DAY
1---Combine flours and salt in a large mixing bowl. In a smaller bowl, combine water, olive oil, and yeast.
2---Make a well in the flour mixture and pour into it the wet mixture. Use a fork to incorporate flour from the sides of the bowl into the center, rotating the bowl, until the dough begins to come together. Mix with your hands and knead for 3 minutes.
3---Rest the dough, covered, for 15 minutes, and then knead for 3 more minutes.
4---Divide dough into 8 equally-sized portions. A bench scraper is a great tool for this. Slice off a hunk and weigh it. Each ball should be around 130 grams, so add to it or subtract as needed. If you don't have a kitchen scale, the best way to do this is to cut the whole dough ball in half. Then cut each half in half again, and then once more. This will help decrease size differences, though uniformity is not super crucial here.
5---Make the dough balls, and proof. Pull the edges of the dough portion into the center, rotating as you do. Once you've done a full rotation and have a dough round, pinch together the gathered parts, twist, and put that pinched side down into a well-floured storage container, leaving a few inches between balls. We like to use a food storage tub with lid but you can just as well use a floured glass casserole dish with a lid or plastic wrap. (Ours is a little more shallow than the one linked, but I can't find it online. We picked it up at Restaurant Depot.) Allow the dough to proof in the fridge for 2-3 days. It won't actually expand that much, but the long proof time does two major things. 1 - It allows the dough to form a tangier taste, which is what we want. 2 - It gives you the freedom to plan ahead. Let's not underestimate this advantage! The more I grow as a cook, the more I appreciate recipes that can be spread out over a day or a few days. It allows for so much less day-of stress!
PIZZA DAY!
6---Remove your dough from the fridge 2 hours before pizza-making to allow it to come to room temperature and re-activate the yeast at this temperature.
7---Put a rack on the highest level in your oven and turn the broiler on HIGH or just ON if there's no heat mitigation. Put your cast iron on a medium-large burner and turn to HIGH. Have your toppings and sauces ready to go, in close proximity to the oven.
8---While the heat builds, stretch your first dough ball. First, flour a large wooden cutting board for your work surface. Then, use your fingers to lightly poke little pockets into the dough, covering it all over. Next, pick the dough up, hold it vertically at the edges, and gently rotate it as gravity stretches the little pockets you made with your fingers. As it gets bigger, you can switch to rotating the dough with your fists, but since we're only making 9" rounds, you probably don't need to do this. Let gravity do most of the work, don't pull too much. You should only need to do minimal stretching, if at all. The finger-pocket technique should do most of the work for you. Put finished round back on floured surface.
9---Lightly flour the hot cast iron. Do not use oil! The flour may begin to smoke and turn light brown, that is ok. Carefully add the dough round to the pan. Add your sauce with a large spoon, starting at the center and using the back of the spoon to swirl it out and cover except for the edges. Add whatever toppings you are using. Relax, you have time. At this point, use a spatula to check the bottom of the pie. It should be getting close to medium brown, but if it's not there yet, give it time and keep checking.

10---Load the cast iron into the oven on the top rack directly under the broiler. Close the oven and wait anywhere from 60-90 seconds for a strong gas oven, to 3-5 minutes for an electric oven. Keep your oven light on and take a look. If it is cooking unevenly, rotate it. Once you get those dark brown spots on your crust and cheese, the pizza top is done. Pull it out and check the bottom. If the bottom still needs a little cooking, return it to the burner until it has developed some dark brown spots.
11---Put the finished pie on a cutting board and give it a couple of minutes before cutting. We know you're excited, but we don't want you to burn your mouth! You can begin stretching the next round as the pizza cooks in the oven, or do it after you pull it out. Think of this cooking process as similar to grilling; you'll cook some things, pull them off the grill when finished, add more things and roll on. Eat as you cook, or wait until they're all done. There's no wrong way, except ordering from Domino's. Enjoy!